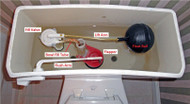
How to Change Toilet Parts
Sep 26th 2018
1
Turn the shut-off valve beneath the toilet tank clockwise until tight. Remove the tank lid and carefully place on a towel to avoid damage. Press down the flush handle to drain the tank. Use your hand to lift the flap if the handle doesn't work. Soak up the water remaining in the tank with a towel.
2
Hold the fill valve with one hand to stabilize it. Use an adjustable wrench to rotate the nut holding the supply line to the tank counterclockwise. Remove the supply line from beneath the tank to access the fill-valve nut. Turn the nut counterclockwise to remove it and release the fill valve.
3
Place a heavy-duty flat-blade screwdriver into the slot on the toilet bolts inside the tank to stabilize them. Use an adjustable wrench to loosen the toilet bolt nuts beneath the tank and bowl.
4
Lift the tank off the bowl. Lay the tank on a towel to access the bottom. Remove the rubber gasket from the bottom of the tank surrounding the toilet bolts and the nut holding the flush valve in the tank.
5
Remove the nut holding the flush valve to the tank with a pipe wrench. The overflow tube connects to the flush valve. Grab the overflow tube with your hand. Pull the flush valve and tube from the tank.
6
Place the gasket around the threads that came with the new overflow tube and flush valve. The flapper should already be attached to the flush valve and overflow tube; if not, snap the flapper over the two plastic prongs of the bottom of the overflow tube.
7
Screw the nut that came with the flush valve to the threads beneath the tank. Tighten the nut with a pipe wrench. Cover the threads and nut with a tank-to-bowl gasket.
8
Set the tank on the bowl. Thread the tank bolt gaskets onto the new tank bolts. Insert the new tank bolts through the holes in the tank and the bowl. Thread the nuts onto the bolts beneath the bowl and tighten the nuts with the adjustable wrench.
9
Place the fill valve gasket over the threaded end of the new fill valve. Insert the threads of the fill valve through the hole at the bottom of the tank. Screw the fill-valve nut onto the fill valve. Hand-tighten the nut with your fingers to secure the valve in the tank. Attach the supply line to the fill valve beneath the fill-valve nut. Tighten the supply line with the adjustable wrench.
10
Slide the refill tube onto the connector at the top of the fill valve. Position the refill tube over the overflow tube. Cut the connection end of the refill tube with scissors if it is too long.
11
Connect the chain from the flush handle to the flapper. Turn the shut-off valve counterclockwise to fill the tank with water. As the water fills the tank, use your fingers to squeeze the spring clip on the side of the float. Slide the float up or down while squeezing the clip to set the tank water level. Once the tank fills, the float stops the water from flowing, and the water level should rest at least one inch below the top of the overflow tube or at the water level line marked on the inside of the tank. Replace the tank lid.
Things You Will Need
- Towels
- Adjustable wrench
- Heavy-duty flat-blade screwdriver
- Pipe wrench
- Overflow tube and flush valve
- Tank-to-bowl gasket
- Tank bolt gaskets
- Tank bolts
- Fill valve gasket
- Fill valve
- Refill tube
- Scissors


